Rock Tumbling Grit Guide transforms rough stones into polished gems through careful selection of abrasive materials. The right grit makes the difference between amateur results and professional-quality stones that shine like jewelry.
Understanding grit types, sizes, and application stages helps you achieve consistent polishing success. Each stage requires specific grit characteristics to remove scratches from the previous step while preparing stones for the next level of refinement.
TL;DR
- Use 60/90 grit for stage 1 coarse grinding with a 1:1 grit-to-rock ratio by volume.
- Progress through 4 stages: coarse (60/90), medium (120/220), fine (500/600), and polish (cerium oxide).
- Clean tumbler and stones thoroughly between each stage to prevent grit contamination.
- Stage 1 takes 7-10 days while final polishing requires only 3-5 days to complete.
Rock Tumbling Grit Guide Fundamentals
Rock tumbling grit serves as the abrasive material that gradually shapes and smooths rough stones. These particles come in measured sizes that correspond to specific stages in the tumbling process.
Silicon carbide forms the backbone of most tumbling operations due to its hardness and cutting ability. This synthetic material rates 9.5 on the Mohs hardness scale, making it effective against most rock types you’ll encounter.
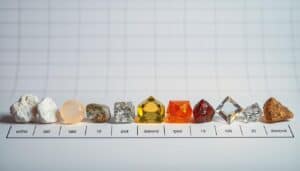
Grit Size Numbering System
The numbering system indicates particle size – lower numbers mean coarser grit. A 60/90 grit contains particles that pass through a 60-mesh screen but not through a 90-mesh screen.
Understanding this system helps you select appropriate materials for each stage:
- Coarse (60/90) – Removes major imperfections and shapes stones
- Medium (120/220) – Smooths surfaces and eliminates coarse scratches
- Fine (500/600) – Prepares stones for final polishing stage
- Polish – Creates mirror-like finish using cerium oxide or aluminum oxide
The Four-Stage Tumbling Process
Each tumbling stage serves a specific purpose in transforming rough rocks into polished stones. The progression from coarse to fine grit gradually refines the stone surface, and understanding how long rock tumbling takes helps you plan your projects effectively.
Stage 1: Coarse Grinding
The coarse grinding stage removes the most material and establishes the stone’s final shape. Use 60/90 silicon carbide grit with enough water to create a thick slurry.
This stage typically runs 7-10 days depending on rock hardness. Check progress every few days by examining stone surfaces for smoothness and uniform shape.
Stage 2: Medium Grinding
Medium grinding with 120/220 grit removes scratches left by coarse grit. This stage usually requires 5-7 days of continuous tumbling to achieve proper surface preparation.
Monitor the barrel contents to ensure adequate water levels throughout the process. Add small amounts of water as needed to maintain proper consistency.
Stage 3: Fine Grinding
Fine grinding uses 500/600 grit to create smooth surfaces ready for polishing. This stage takes 4-6 days and produces stones with a matte finish that feels smooth to touch.
Proper cleaning between stages becomes critical at this point since any remaining coarse grit will scratch the fine surface. Learn proper rock cleaning techniques to avoid contamination issues.
Stage 4: Final Polishing
The polishing stage uses cerium oxide, aluminum oxide, or commercial polishing compounds. This final step creates the mirror-like shine that makes tumbled stones attractive for jewelry and display.
Run the polishing stage for 3-5 days with careful attention to barrel speed and media levels. Too much polish compound can actually dull the finish rather than improve it.
Grit Quantity Guide
Use 2 tablespoons of grit per pound of rocks in rotary tumblers. Vibratory tumblers need about half this amount due to more efficient grinding action.
Selecting Grit for Different Rock Types
Rock hardness determines appropriate grit selection and tumbling duration. Soft rocks like limestone require gentler treatment while hard materials like jasper can handle aggressive grinding.
Soft Rocks (Hardness 3-5)
Soft rocks including calcite, fluorite, and some agates need careful grit selection. Start with 120/220 grit instead of coarse 60/90 to avoid excessive material removal – check our guide on soft rocks for tumbling for detailed recommendations.
These materials often complete tumbling faster than hard rocks. Check progress frequently to prevent over-processing that can round off interesting details.
Medium Hardness Rocks (Hardness 5-7)
Most common tumbling rocks fall into this category including quartz varieties, feldspars, and many agates. Standard grit progression works well for these materials.
Follow normal timing guidelines but adjust based on specific rock characteristics. Discover which rocks work best in standard tumbling operations.
Hard Rocks (Hardness 7+)
Very hard materials like jasper, chert, and some granites require extended coarse grinding periods. These rocks may need 10-14 days in stage 1 to achieve proper shaping.
Consider using ceramic media during coarse grinding to help break down hard materials more efficiently. The ceramic pieces provide additional impact energy during tumbling.
Grit Quality and Brand Recommendations
Premium grit produces better results and lasts longer than generic alternatives. Quality materials maintain consistent particle sizes and contain fewer impurities that can cause scratching.
Silicon Carbide Sources
Lortone and Highland Park offer reliable silicon carbide grit in all standard sizes. These brands maintain strict quality control and provide consistent particle size distribution.
Avoid automotive polishing compounds or sandblasting grit as substitutes. These materials contain additives or irregular particles that can damage stones during tumbling.
Polishing Compounds
Cerium oxide provides the best polish for most rock types but costs more than aluminum oxide alternatives. Tin oxide works well for soft materials but may not effectively polish very hard stones.
Commercial polishing compounds often blend different materials for versatility. Test small batches first to determine which polish works best with your specific rock types.
Common Grit Selection Mistakes
Skipping grit stages leads to poor results and wasted time. Each stage removes specific scratch patterns from the previous step – jumping ahead leaves visible imperfections, which is one of many rock tumbling mistakes that can ruin your results.
Using too much grit wastes material and can cause excessive wear on tumbler barrels. Follow manufacturer recommendations for grit quantities based on barrel size and rock load.
Contamination Prevention
Cross-contamination between stages ruins polishing results. Clean all equipment thoroughly between stages using soap and water followed by careful inspection for remaining grit particles.
Store different grit sizes in labeled containers to prevent mixing. Even small amounts of coarse grit in fine stages will create visible scratches on finished stones.
Troubleshooting Grit Issues
Stones that remain rough after extended coarse grinding may indicate grit breakdown or insufficient quantities. Fresh grit maintains cutting ability while worn grit just creates mud without effective grinding.
Excessive noise during tumbling often signals problems with grit consistency or barrel loading. Properly loaded barrels with adequate grit should run relatively quietly after the initial break-in period.
Grit Life and Replacement
Silicon carbide grit gradually breaks down during use, becoming less effective over time. Replace grit when stones stop showing progress or when the material becomes muddy rather than gritty.
Save used fine grit for pre-polishing applications with less valuable stones. This practice helps reduce costs while maintaining quality results for your best specimens.
Frequently Asked Questions
What grit size should I start with for rock tumbling?
Start with 60/90 silicon carbide grit for most rocks. Use 120/220 grit for very soft stones to prevent excessive material removal during the first stage.
How long does each tumbling stage take?
Stage 1 takes 7-10 days, stage 2 requires 5-7 days, stage 3 needs 4-6 days, and final polishing takes 3-5 days. Adjust timing based on rock hardness and desired results.
Can I reuse tumbling grit?
Fine grit can be reused once if properly cleaned and stored. Coarse grit breaks down too quickly for effective reuse in most applications.
What happens if I skip a grit stage?
Skipping stages leaves scratches from coarser grit visible in the final polish. Each stage removes specific scratch patterns that the next stage cannot effectively eliminate.
How much grit should I use per batch?
Use 2 tablespoons of grit per pound of rocks in rotary tumblers. Vibratory tumblers need about half this amount due to more efficient grinding action.
Final Thoughts
Rock Tumbling Grit Guide success depends on understanding the relationship between grit size, rock hardness, and processing time. Quality grit and proper stage progression create professional results that rival commercial operations.
Start with small batches to learn your equipment and develop techniques before processing valuable specimens. The patience required for proper tumbling pays off with stunning polished stones that last for years.