Rock Tumbling Supplies are essential tools that transform rough stones into beautiful polished gems through a systematic grinding and polishing process. Whether you’re a beginner starting your first tumbling project or an experienced hobbyist looking to upgrade your equipment, having the right supplies makes all the difference in achieving professional-quality results.
The rock tumbling process requires specific materials and equipment that work together to gradually smooth and polish stones over several weeks. Understanding what supplies you need and how to use them properly will save you time, money, and frustration while helping you create stunning polished stones.
TL;DR
- A complete rock tumbling setup requires a tumbler, grit (4 stages), plastic pellets, and polishing compound – expect to spend $150-300 for quality equipment.
- Stage 1 grit (60/90 mesh) does 80% of the shaping work and typically runs for 7-10 days depending on rock hardness.
- Ceramic media lasts 10-15 times longer than plastic pellets and produces better results for serious tumblers.
- Pre-forms (partially shaped stones) can cut tumbling time from 4-6 weeks down to 2-3 weeks for faster results.
Rock Tumbling Supplies You Need to Get Started
Every successful rock tumbling operation starts with the right equipment and materials. The basic supplies create a complete system that gradually transforms rough rocks into smooth, polished gems through four distinct stages of grinding and polishing.
Your essential supply list includes a rock tumbler, silicon carbide grit in four different grades, plastic pellets or ceramic media, polishing compound, and suitable rocks to tumble. Each component plays a specific role in the multi-week process that produces professional-quality results.
Rock Tumblers
The tumbler itself is your most important investment and comes in two main types. Rotary tumblers use rotating barrels and work best for beginners, while vibratory tumblers use vibrating action and produce faster results for experienced users.
- Rotary tumblers – slower but gentler action, perfect for beginners, typically $50-150 for quality models.
- Vibratory tumblers – faster processing, better for experienced users, usually $100-300 for good units.
- Barrel capacity – 3-pound capacity handles most home projects, while 12-pound units work for serious hobbyists.
Silicon Carbide Grit
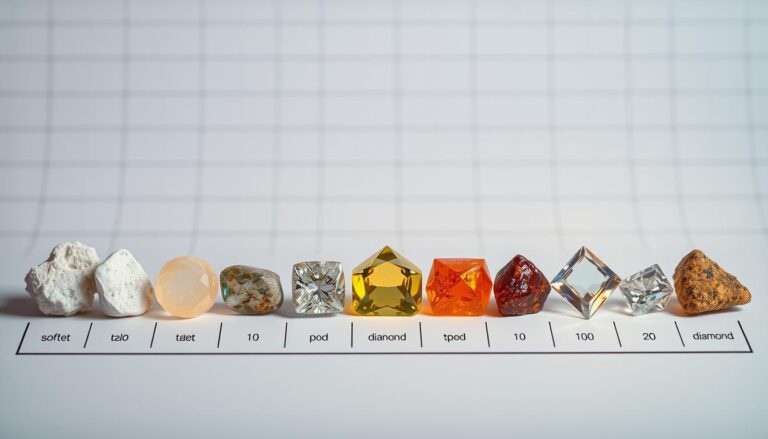
Grit does the actual grinding work and comes in four progressively finer grades. Each stage removes scratches from the previous stage while adding finer scratches that the next stage will remove.
- Stage 1 (60/90 grit). Coarsest grit that shapes rocks and removes major flaws, runs 7-10 days.
- Stage 2 (120/220 grit). Medium grit that smooths surfaces and removes coarse scratches, runs 7 days.
- Stage 3 (400/600 grit). Fine grit that prepares surfaces for polishing, runs 7 days.
- Stage 4 (1200+ grit). Pre-polish that creates the final smooth surface, runs 3-7 days.
Tumbling Media and Cushioning Materials
Tumbling media fills empty space in your barrel and provides cushioning that prevents rocks from chipping against each other. The right media also helps distribute grit evenly and maintains proper barrel loading for optimal results.
Most beginners start with plastic pellets because they’re inexpensive and readily available. However, understanding the differences between plastic pellets vs ceramic media helps you make better choices, as ceramic media costs more initially but lasts much longer and produces superior results for serious tumblers.
Plastic Pellets
Plastic pellets are small cylindrical pieces that cushion rocks during tumbling. They work well for beginners but wear out relatively quickly and need regular replacement.
- Standard pellets – work for most rocks, need replacement every 3-5 cycles.
- Mixed shapes – combinations of cylinders and spheres provide better cushioning.
- Size matching – pellets should be roughly half the size of your smallest rocks.
Ceramic Media
Ceramic media consists of small ceramic shapes that last much longer than plastic pellets. They’re harder and more effective at grinding, making them the preferred choice for experienced tumblers.
- Ceramic cylinders – most common shape, excellent for general tumbling.
- Ceramic triangles – reach into crevices better than cylinders.
- Mixed ceramic media – combines different shapes for optimal results.
Loading Your Barrel Correctly
Fill your barrel 2/3 full with rocks and media combined – never more or the tumbler won’t work properly. Use a 50/50 mix of rocks and media for best results.
Polishing Compounds and Final Stage Materials
The final polishing stage requires special compounds that create the mirror-like shine on your finished stones. These materials work differently than silicon carbide grit and require specific handling techniques for optimal results.
Cerium oxide and aluminum oxide are the most common polishing compounds, with each producing slightly different results on various rock types. The choice often depends on the hardness and composition of the stones you’re tumbling.
Cerium Oxide
Cerium oxide produces excellent results on most rocks and is the standard choice for final polishing. It works particularly well on quartz, jasper, and agate varieties.
- Fine powder – creates mirror-like finishes on hard stones.
- Easy cleanup – washes away more easily than some alternatives.
- Consistent results – reliable performance across different rock types.
Aluminum Oxide
Aluminum oxide (white or brown) offers an alternative to cerium oxide and sometimes produces better results on certain stones. It’s also typically less expensive than cerium oxide.
- White aluminum oxide – produces excellent shine on most stones.
- Brown aluminum oxide – slightly more aggressive, good for harder rocks.
- Cost effective – usually cheaper than cerium oxide options.
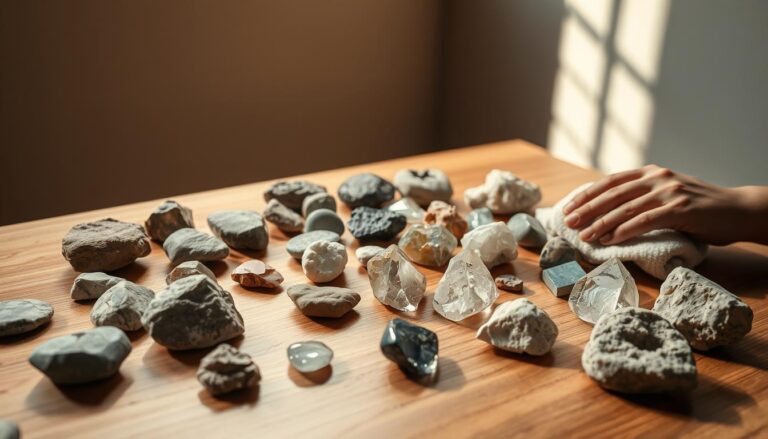
Selecting Rocks for Tumbling
Not all rocks tumble well, and choosing the right stones makes the difference between success and frustration. Hard, dense rocks with minimal fractures produce the best results, while soft or heavily fractured stones often break apart during tumbling.
Beginners should start with proven tumbling rocks like quartz, jasper, or agate before experimenting with more challenging materials. These rocks are readily available and almost always produce excellent results when tumbled properly.
Best Rocks for Beginners
Certain rocks consistently produce excellent results and are forgiving of beginner mistakes. Our complete guide to the best rocks for tumbling covers proven materials that build confidence and teach proper techniques.
- Quartz varieties – including rose quartz, smoky quartz, and clear quartz.
- Jasper types – red jasper, picture jasper, and other jasper varieties.
- Agate specimens – botswana agate, crazy lace agate, and similar types.
- Petrified wood – tumbles beautifully and shows stunning patterns.
Rocks to Avoid
Some rocks are unsuitable for tumbling either because they’re too soft, too fractured, or have properties that make them difficult to polish. Learning about rocks not to tumble prevents disappointment and wasted supplies.
- Obsidian – too brittle and breaks easily during tumbling.
- Turquoise – too soft and often falls apart in the tumbler.
- Heavily fractured stones – break apart regardless of hardness.
- Very soft rocks – anything under 6 on the Mohs hardness scale.
Maintenance and Cleaning Supplies
Keeping your equipment clean and well-maintained ensures consistent results and extends the life of your supplies. Regular cleaning prevents contamination between stages and keeps your tumbler running smoothly.
Simple cleaning supplies like old toothbrushes, buckets for washing, and clean towels make maintenance easy. Having dedicated cleaning tools prevents cross-contamination that can ruin a batch of stones. Proper rock tumbler barrel cleaning is essential for maintaining equipment in like-new condition.
Essential Cleaning Tools
Basic cleaning equipment makes maintenance quick and thorough. These inexpensive tools pay for themselves by preventing problems and extending supply life.
- Old toothbrushes – perfect for scrubbing grit from rocks and equipment.
- Plastic buckets – dedicated containers for washing rocks and media.
- Screen or colander – separates rocks from grit and water easily.
- Clean towels – dedicated towels that won’t introduce contaminants.
Frequently Asked Questions
How much do rock tumbling supplies cost to get started?
A basic setup with tumbler, grit, media, and polishing compound costs $150-300. Higher-quality equipment costs more initially but produces better results and lasts longer.
How long does silicon carbide grit last?
Each pound of grit typically handles 2-3 batches of rocks before losing effectiveness. Stage 1 grit breaks down fastest due to the heavy grinding work it performs.
Can I reuse tumbling media?
Plastic pellets last 3-5 cycles before wearing out, while ceramic media lasts 10-15 cycles or more. Clean all media thoroughly between uses to prevent contamination.
What happens if I skip a grit stage?
Skipping stages leaves scratches that the polishing compound cannot remove. Each stage removes specific scratch sizes, so all four stages are necessary for proper results.
How do I know when each stage is complete?
Stage 1 is done when rocks are rounded and shaped, stages 2-3 when scratches from the previous stage disappear, and stage 4 when stones develop a pre-polish shine. Our progress check guide helps you monitor each stage for perfect results.
Final Thoughts
Rock Tumbling Supplies form a complete system that transforms rough stones into beautiful polished gems through patience and proper technique. Starting with quality equipment and materials sets you up for success and prevents the frustration that comes from using inadequate supplies.
Begin with a basic setup and proven tumbling rocks like quartz or jasper to learn the process. Once you master the fundamentals, you can expand your supply collection and experiment with more challenging materials.